Nine months of a gym membership you barely touch costs roughly the same as the slab, drainage, and enclosure for a small backyard plunge setup. The difference is that one of those things sits twenty steps from your back door at 6:40 on a Tuesday morning.
That trade is the whole argument. Utah homeowners are waking up to a simple math problem: a gym you drive to has commute, crowd, and closing hours baked into it. A plunge pavilion on your own property has none of those. If you’re pricing equipment, a cold plunge dealer in utah that shoppers compare locally will usually be handling the tub, the chiller, and the install together, which saves you from buying three parts that don’t fit.
What follows is the design and logistics side of that decision. Not the tub specs. The pavilion around the tub.
What a plunge pavilion actually is
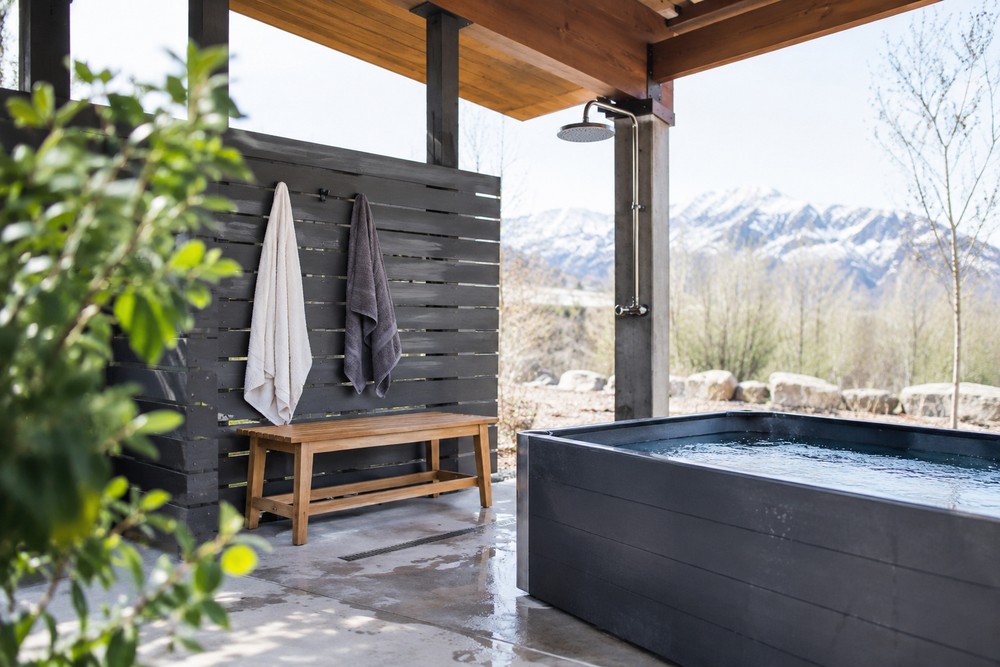
Most people picture a tub on a patio. A pavilion is a distinct zone: a hard surface that drains, a water line that survives winter, power for a chiller and pump, and some kind of cover or enclosure so you’re not chipping ice off a lid in January. The tub is the smallest part of the budget once you count all four.
The reason to build a dedicated zone rather than drop a plunge into an existing patio has to do with water management. A chiller runs constantly. Condensation collects. Splash happens every session, and in a corner of a finished patio that means standing water against your foundation or a slippery walkway nobody wants to cross barefoot.
A small, graded pad with a drain solves that in a few hundred square feet. That’s the whole concept.
The Four Zones framework
I’ll give you the layout I’d use, and I’ve drawn it out this way for a reason: every cold-water setup I’ve walked through that felt annoying to use was missing one of these four zones.
- Wet zone. The graded pad and drain directly under and around the tub. Slope it away from the house at minimum, and put a channel drain on the low side.
- Dry zone. A bench or stool, towel hooks, and a place to put shoes down where they won’t get soaked. Two square feet per person is plenty.
- Heat zone. Whatever you use to warm back up. A sauna if you’re building one anyway, otherwise a covered spot out of the wind. More on this below.
- Service zone. Access to the chiller, filters, and any plumbing shutoff without dragging equipment through mud in February.
Here’s the opinion you didn’t ask for: the service zone is the one people skip, and it’s the one that decides whether you still like this thing in year three. Chillers need airflow and occasional service. Bury it behind a trellis you have to disassemble and you’ll dread maintenance day.
Does a plunge pavilion pay for itself?
Not in resale dollars, and I’m not going to pretend otherwise. A plunge setup is a lifestyle purchase. What it can replace, though, is a recurring monthly bill, and that math is worth running honestly.
According to the Bureau of Labor Statistics, personal care and services sit inside the household spending categories most families track, and gym or club dues are a routine line item for a lot of them. Stack twelve months of family memberships next to a one-time build and the build starts looking less like an indulgence. The catch is that you have to actually use it, which is why the layout matters more than the brand on the chiller.
Run your own version of that math before you shop. Add up twelve months of dues, the fuel you burn getting there, and any class fees you pay separately. Then compare it to a build quote. I’d rather you see the number going in than be surprised by it.
Utah weather changes the plan
Cold plunge season in St. George and cold plunge season in Logan are not the same season. Along the Wasatch Front, you’re dealing with snow load, freeze-thaw cycles that heave anything poorly footed, and enough dry summer air that a heated space feels obvious by July.
Freeze protection is the part I’d get engineered rather than improvised. Exposed supply lines need shutoffs and draining, or heat tape, or both. Set the pad deep enough and compacted properly so frost movement doesn’t crack it. The Environmental Protection Agency has solid general guidance on handling and conserving water responsibly if you’re figuring out how to manage drainage and runoff in a residential setting.
The other Utah-specific wrinkle: the same dry air that makes summer pleasant pulls heat out of a plunge room fast in winter. If your enclosure is open on one side, expect a wind chill that turns a four-minute session into a two-minute one. That’s fine. Just plan a short covered path back to the house.
The pairing question: sauna, plunge, or both?
Both. If the budget only allows one, build the plunge first and design the pavilion so a sauna can bolt on later. That’s the order I’d choose, because a plunge needs less floor space, less power draw, and no framing for heat.
Heat cycling matters here. The whole appeal of alternating between hot and cold depends on having both within a few steps, so the geometry of your build is really a hot-and-cold proximity problem. A shower stall, the plunge, and the sauna door in a ten-foot triangle is the shape you’re aiming for. Anything wider and you’ll do the routine less often.
One practical note on the water itself: enclosed plunge water sits for long stretches, and ozone systems are common on quality tubs for a reason. Ask any vendor how they sanitize and how often filters need changing before you commit.
A build order that saves you money
- Pick the tub and chiller first. Their dimensions and electrical draw dictate everything downstream, including pad size.
- Lay out the four zones on paper. Mark the path from your back door, then mark it again in winter boots.
- Get the drainage and grade figured out. Have this drawn by someone who does site work, not a general contractor guessing.
- Check the electrical plan. Chillers draw more than people expect. A dedicated circuit is worth the extra line item.
- Confirm local code and permitting. Deck, plumbing, and electrical work in residential yards typically all fall under some approval process. Verify with your city before digging.
- Build the enclosure last. Live with the open setup for a month, then frame around what you actually needed.
Skipping step six is the most common regret. Pergolas get built too shallow, too tall, or facing the wrong sun angle for a room you only ever use at dawn or after dark.
Snow, heat, and long-term upkeep
Plan for two maintenance seasons rather than one. Before the first freeze, drain and inspect any exposed plumbing and clear debris from drains. Before the first hot stretch, check the chiller’s air intake and clean the cover.
Snow load is worth a real conversation with whoever frames your roof structure. Regional climate patterns have been shifting enough that the National Oceanic and Atmospheric Administration tracks precipitation and temperature trends as a matter of course, and building for last winter’s snowfall is a short-sighted habit. Design for the heavier year.
Beyond that, it’s towels, filter changes, and a monthly glance at water chemistry. Boring upkeep, which is exactly what you want from a backyard structure.
The bottom line
A pavilion turns a cold plunge from a novelty into a routine. Four zones, a drained pad, real access for service, and a hot source within arm’s reach is the entire formula, and everything else is finishes.
Start with your January morning in mind. Picture the walk from bed to bench to water to warm. If that path is short, covered, and dry, you’ll use it. If it involves unlocking a gate and picking gravel out of your feet, you won’t. Where does your current patio fall on that scale?